13 Things to do immediately after installing Ubuntu
In this article i describe some of the things to do immediately after installing ubuntu on your machine . Since most of the people reading this would be shifting
Creating Your ultimate Ubuntu 7.10 Desktop
Ubuntu 7.10 Codenamed Gusty Gibbon was released few weeks back with much fanfare ,now Ubuntu for past couple of years has been one of the most popular Desktop Linux distributions . Ubuntu 7.10 includes a number of features , applets and Wizards to simplify desktop Linux experience however because of many licensing restrictions it does not include out of the box support for popular audio/video codecs and many commercial but good applications . Also because of the limitation of trying to accommodate all kind of applications on single CD Ubuntu comes with a limited set of applications .
Now , i often have arguments with my friends who are new to computers that windows is better , mac is better and blah blah blah and they often use this argument that its difficult for newbies
Steps Written in RED are of paramount importance and other steps may not work correctly if these steps are not followed .
Step 1 : - Enabling Additional Repositories
Now many applications need additional repositories to be installed or some to be enabled in Synaptic package manager so before trying out steps given below ensure that repositories in order.
Launch Synaptic Package Manager (System -> Administration -> Synaptic Package Manager ) , then in Synaptic package manager go to (Settings -> Repositories ) you will find window like this . Ensure that all the check boxes are marked leaving source code(if you want to you can enable this also but you are not going to need this unless you are software developer) the dialog box should look like this .
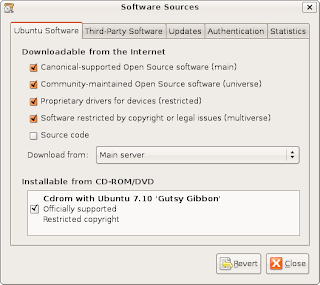 Dialog Box showing the repositories that should be enabled
After completing above step you will find a dialog box like this
Besides these you may also like to add medibuntu repositories if you want to install applications like ------- , to add mediubuntu repositories follow the following steps
echo "deb http://packages.medibuntu.org/ gutsy free non-free" | sudo tee -a /etc/apt/sources.list
and
wget -q http://packages.medibuntu.org/medibuntu-key.gpg -O- | sudo apt-key add - && sudo apt-get update
2. Enabling Cool Graphics Effects
Unlike previous releases of Ubuntu where one had to manually download and install compiz,beryl etc (Compiz Fusion is composite window manager that provides best features of Compiz and Beryl) from Repositories if one wanted to have glitzy visual effects . Ubuntu 7.10 comes with Compiz Fusion pre-installed and on supported hardware offers a wide array of Visual Effect . Now depending on graphic hardware of computer one could chose from three level of Visual Effect (From System -> Preferences -> Appearance )
None : - This mode causes Ubuntu to use Metacity instead of Compiz Fusion , with no visual effect
Basic : - Has only simple visual effects like shadows , fading windows-menus etc
Advanced : - Recommended for PC with descent graphic hardware , enables effects like wobbly windows, transparency , animated workspace switching etc
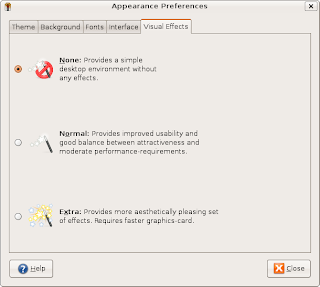 Visual Effect Dialog Box
However , compiz-fusion is capable of much more and you can enable more desktop effects /customize compiz by typing the following command in the terminal window : -
sudo apt-get install compizconfig-settings-managerAfter completing above step , you can customize compiz by going to System > Preferences > Advanced Desktop Effects Settings .
3. Installing Audio/Video Codecs
The first thing anyone who wants to use Ubuntu as a replacement to their windows operating system would like to do is install support for all kind of audio/video multimedia codecs . Ubuntu does not come installed with support for major audio/video formats because of licensing issue and other issues . To install support for audio/video codecs type in the following command in the terminal window : -
sudo apt-get install gstreamer0.10-plugins-bad gstreamer0.10-ffmpeg gstreamer0.10-plugins-uglyAnd if you want to install mp3 support in nautilus you may like to install mpg123 which is a nice command line based utility for playing mp3 files and it works well even on modest hardware .
sudo apt-get install mpg123
This would enable most of the popularly used codecs in the Totem Movie player which uses the GStreamer framework to play audio/video files.
If you want to use a different media player and framework you might try installing MPlayer or VLC (depending on which you prefer ) instructions on installing them are listed below .
Installing VLC Player : -
LC Player is another of popular video player available under Linux . It is released under GNU General Public license and is available for different platform including Windows,Linux,BeOS,Mac OS X etc. VLC player is based upon free open source libraries like libdvdcss,FFMpeg for decoding various video formats.One Important feature of VLC Player is its ability to play files over NetWork Protocols. The Frontend of VLC player is created using wxWidgets toolkit and its appearance can be changed by using different skins. One Popular feature of VLC Player is its ability to play files that are incomplete/broken or partially downloaded , making it useful for previewing file while downloading on file-sharing networks.
To install VLC Player type the following command in the terminal window : -
sudo apt-get install vlc
After completing above step launch vlc player from (Applications -> Sound and Video -> VLC media player )
3. Installing Linux DC++ Client
DC++ is a popuar tool used for p2p file sharing and is especially popular in college campuses , to install dc++ for linux follow the following instructions .
Type the following command in the terminal window: -
sudo apt-get install linuxdcppAnd after completing above step launch dcpp from (Applications -> Internet -> DC++)
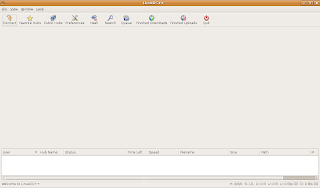 Linux Client of popular DC++ Application
aMule
aMule is alternative to popular eMule program on windows platform , amule supports/works with eDonkey2000 Network or Kadnetwork and allows P2P sharing of files . aMule is available on number of platforms , Current supported systems include Linux, Mac OS X, FreeBSD, NetBSD, OpenBSD, Windows and Solaris.
To install aMule type the following command in the terminal window : -
sudo aptitude install amuleAfter completing above step launch aMule from (Application -> Internet -> aMule )

4. Installing Adobe Acrobat Reader
* Requires Mediubuntu repositories
Type in the following command in the terminal window :
sudo aptitude install acroread acroread-plugins acroread-escript
and , plugin for firefox
sudo aptitude install mozilla-acroread
5. Installing Macromedia Flash support and Sun Java JRE
Both Macromedia Flash and JRE are an important part of internet experience almost all the websites use either of the two technology to add extra functionality to the web page . By default Ubuntu does not come preinstalled with support for these two , however they can be installed quite easily by typing in the following command in the terminal window .
To install flash type in the following command in the terminal window this command is going to download a script that would further download the files needed for installing flash-support and install it .
sudo apt-get install flashplugin-nonfree
 Script downloading further files needed for installing flash support
sudo aptitude install sun-java6-jre sun-java6-plugin sun-java6-fonts
6. Scribus
Scribus is one of the most impressive Desktop Publishing application that is free and cross platform . Scribus is available on Windows , Mac OS X , Linux , OS/2 etc . It is highly suited for preparing file for professional quality image setting equipment .It has high end page layout features of the kind found in Adobe PageMaker, QuarkXPress and Adobe InDesign.
It can also create animated and interactive PDF presentations and forms. Example uses include writing small newspapers, brochures, newsletters, posters and books.
Anyways , to install scribus type the following command in the terminal (Application ->Accessories -> Terminal )
sudo aptitude install scribus
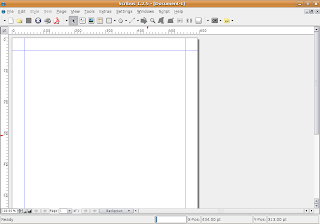 Scribus on Ubuntu
7. Downloader For X
Downloader for X is a nice download manager that allows downloading files from Internet , pausing them and downloading them later . It also supports splitting file into number of segments so that files could be downloaded quickly . However one thing that i didnt like about is its interface is somewhat difficult as compared to some of the download manager available on Windows.
Anyways to install " Downloader for X " type the following command in the terminal window.
�sudo aptitude install d4x "
After installation is over launch �Downloader for X� by typing �d4x� in the terminal window , or by going to (Applications-> Internet -> Downloader for X )
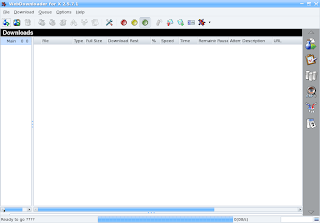 This is how Downloader for X looks
8. Google Desktop
Google Desktop allows one to full text search of a users e-mail, computer files, music, photos, chat, and Web pages viewed,OpenOffice documents , PDF files and more .
Now similar tools already existed on Linux like beagle (supported by novell ) , meta tracker etc . However Google Desktop search is not based on any of these tools and uses its proprietary algorithms to search for files on the computer ,also being 1.0 release and more stable then these products it could be preferred over tools like beagle .
To install type the following command in the terminal window : -
wget http://dl.google.com/linux/google-repo-setup.sh
and
sudo bash google-repo-setup.sh
Now after completing above steps to install Google Desktop Search type the following command in the terminal window : -
sudo apt-get update
and
sudo apt-get install google-desktop-linux
After completing above step logout of gnome session and relogin you would find the following dialog window
select the appropriate option : -
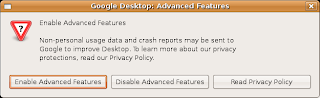
Now after choosing appropriate option you would find Google Desktop icon in the bar at the top of the screen , now it would automatically scan and index files on computer and store it in local database which could be searched using web browser .

9. Google Picasa
Google Picasa is an extremely professional good looking photo management application available on Windows ,Linux and Mac OS (??) . Now Google Picasa has a number of features that many photo management software on Linux dont have further Google Picasa looks very user friendly as compared to similar open source application available on linux . Now Google Picasa for Linux is not a native linux application but runs on Linux thru application layer called wine which allows many windows application to run flawlessly on Linux.
Now to install Google - Picasa type the following command in the terminal window
wget http://dl.google.com/linux/deb/pool/non-free/p/picasa/picasa_2.2.2820-5_i386.deb
and
sudo dpkg -i picasa_2.2.2820-5_i386.debAfter completing above step launch Google Picasa from
Some Tips to consider before running picasa (taken from google picasa website )
Tips
- If you use NFS, when Picasa first starts, tell it to scan just your desktop! Otherwise Picasa gets real slow while it scans all your NFS directories!
- To get Picasa to see pictures on your hard drive, click "File / Add Folder" (NOT "Import").
- When adding a folder to Picasa, the default action is to remove the folder from Picasa. You have to actively choose Scan once or Scan always.
- Picasa is not supported over remote X connections.
10. Google Earth
To install Google Earth type the following command in the Terminal Window (Application->Accessories -> Terminal ),keep in mind that googleearth is downloaded from Medibuntu repositories and not Ubuntu hence be sure you have activated the repositories correctly as described in first step of this article.�sudo aptitude install googleearth"
After downloading is over you will get a screen like this press �Yes� to accept the license agreement and complete software installation.
Now you can launch Google Earth from (Application -> Internet -> Google Earth) A Picture of Google Earth Running on linux
11. Installing gdesklets
gdesklets gives user a collection of impressive widgets that can be placed on desktop this is similar to feature available on Windows Vista and Mac OS X , it does provide quite a good look to the desktop.
To install gdesklets issue the following command at the command line
sudo apt-get install -y gdesklets
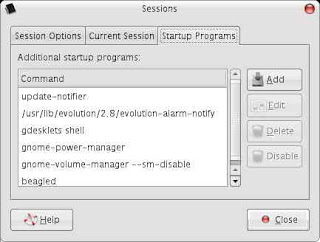 after installation go to (System -> Preferences -> Sessions) There go to Start up program and add gdesklets shell , now every time gnome loads up you should see your gdesklets on the desktop.
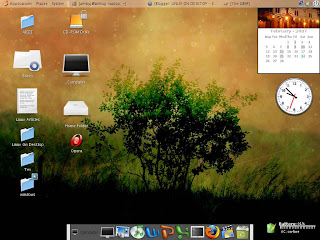 This is how my desktop looked like with all the desklets (Widgets )
12. Installing MPlayer with all codecs and dvd playing support
*This step requires Medibuntu repositories
MPlayer is one of the most popular media player available on linux , it supports playing all the major audio/video file formats . With w32codecs and libdvdcss2 it plays all the major audio/video format,however w32codecs has dll files from windows operating system hence its not available on the ubuntu official repositories and needs to be downloaded from the mediubuntu repositories.
To install MPlayer with all codecs type in the following command in the terminal window : -
After completing above steps you could launch MPlayer by typing in gmplayer in the terminal window or from (Application -> Sound & Video -> MPlayer Movie Player )
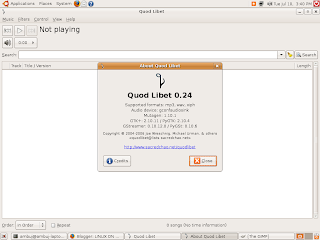
Quod Libet : -
Quod Libet is an extremely versatile music player based on GTK+ that is extendible via plugins , has a rich feature set and has really unique feature of building playlist by searching for particular kind of music files based on search terms or regular expression . It has been programmed in Python programming language and hence its plugin are also created in Python. A number of plugins are available including ones that help in copying songs to digital audio players , last.fm plugin , advanced editing features and many more .
Quod Libet uses GStreamer framework of GNOME to play audio files and hence integrates quite well the the GNOME desktop environment , also audio format supported would be same as the one supported by GStreamer so you may want to install mp3 support since by default many linux distributions these days dont come with mp3 support installed.
To install Quod Libet type the following command in the Terminal Window : -
 Quod Libet Website : - http://www.sacredchao.net/quodlibet
13. RealPlayer
Realplayer is one of the most popular cross platform media player available on Windows,Linux , Mac OS and a number of other platform . RealPlayer plays popular .rm ,rmvb,.mp3 and other media formats.
To install RealPlayer first download RealPlayer10GOLD.bin file from the following website assuming you have downloaded it to your home directory .
After downloading the file go to the directory where you have downloaded the file in terminal window and type
After installation is over type
for installation to begin . Follow the instructions as presented to complete installation .
After installation is over you can launch Real Player from (Application -> Sound & Video -> Real Player 10 ).
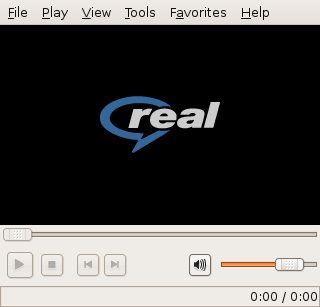 Real Player for Linux
Article Written by : Ambuj Varshney (blogambuj@gmail.com)
For Linux on Desktop , http://linuxondesktop.blogspot.com
(C) 2007 , Ambuj Varshney
*This step requires Medibuntu repositories
MPlayer is one of the most popular media player available on linux , it supports playing all the major audio/video file formats . With w32codecs and libdvdcss2 it plays all the major audio/video format,however w32codecs has dll files from windows operating system hence its not available on the ubuntu official repositories and needs to be downloaded from the mediubuntu repositories.
To install MPlayer with all codecs type in the following command in the terminal window : -
sudo apt-get install mplayer
and
sudo apt-get install w32codecs libdvdcss2
After completing above steps you could launch MPlayer by typing in gmplayer in the terminal window or from (Application -> Sound & Video -> MPlayer Movie Player )
Quod Libet : -
Quod Libet is an extremely versatile music player based on GTK+ that is extendible via plugins , has a rich feature set and has really unique feature of building playlist by searching for particular kind of music files based on search terms or regular expression . It has been programmed in Python programming language and hence its plugin are also created in Python. A number of plugins are available including ones that help in copying songs to digital audio players , last.fm plugin , advanced editing features and many more .
Quod Libet uses GStreamer framework of GNOME to play audio files and hence integrates quite well the the GNOME desktop environment , also audio format supported would be same as the one supported by GStreamer so you may want to install mp3 support since by default many linux distributions these days dont come with mp3 support installed.
To install Quod Libet type the following command in the Terminal Window : -
sudo apt-get install quodlibetand after completing above step launch quod-libet from (Application -> Sound & Video -> Quod Libet )
Quod Libet Website : - http://www.sacredchao.net/quodlibet13. RealPlayer
Realplayer is one of the most popular cross platform media player available on Windows,Linux , Mac OS and a number of other platform . RealPlayer plays popular .rm ,rmvb,.mp3 and other media formats.
To install RealPlayer first download RealPlayer10GOLD.bin file from the following website assuming you have downloaded it to your home directory .
After downloading the file go to the directory where you have downloaded the file in terminal window and type
After installation is over type
�chmod +x RealPlayer10GOLD.bin�
and
�sudo ./RealPlayer10GOLD.bin�
�sudo ./RealPlayer10GOLD.bin�
for installation to begin . Follow the instructions as presented to complete installation .
After installation is over you can launch Real Player from (Application -> Sound & Video -> Real Player 10 ).
Real Player for LinuxArticle Written by : Ambuj Varshney (blogambuj@gmail.com)
For Linux on Desktop , http://linuxondesktop.blogspot.com
(C) 2007 , Ambuj Varshney
PART BELOW IS AN OLDER ARTICLE (Orignal one i had written sometimes back for Ubuntu 6.10)
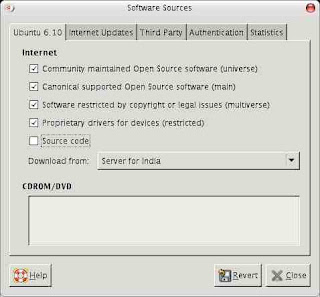
1. Enabling/Adding Extra Repositories
Ubuntu comes by default with only some of the repositories enabled because of licensing issue since downloading certain codecs and apps may be illegal in some countries so you have to enable these repositories/add new repositories to enable installation of these packages.
To enable new repositories go to (System -> Administration -> Synaptic Package Manager ) , type in the root password .Then Go to (Settings -> Repositories ), there enable all the check-boxes to enable all the repositories you need .
 Also for installing some apps extra repositories are needed since they are not in the default repositories so go to third Party and add the following there
deb http://ntfs-3g.sitesweetsite.info/ubuntu/ edgy main main-all
deb http://flomertens.keo.in/ubuntu/ edgy main main-all
This repositories below is for Multimedia files and stuff above was for ntfs-3g you can use any one of the above since they are mirrors.
Comments
Post a Comment